Gambit - Generation of Grid for a 2-D Airfoil
Introduction and Instructions:
In this document is a procedure that enables students to generate a two-dimensional, unstructured grid around an airfoil, which will be used with the CFD program, Fluent. Readers should already be familiar with the notation used in this module, as described in the learning module, Fluent and Gambit - Introduction and General Information.
Overall description of the problem and grid:
- We will model flow over a 2-D airfoil at some arbitrary angle of attack with respect to the freestream flow. The computational domain is bounded on the inside by an airfoil shaped closed path, and by a rectangular box on the outside, as sketched (drawing not to scale).
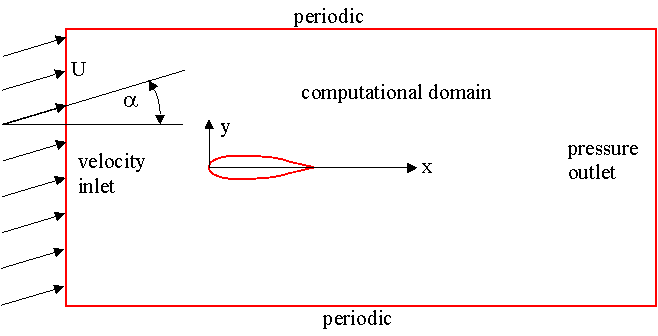
- The airfoil is assumed to have a chord length of 1.0 meters (all dimensions in this module are in the standard MKS system of units), with the front-most part of the airfoil at (0,0,0) and the trailing edge at (1,0,0).
- The computational domain extends far upstream of the airfoil where the boundary condition will be a velocity inlet. The angle of attack will be specified in the CFD flow solver, Fluent. The outlet is to the far right.
- The top and bottom of the computational domain are "periodic" boundary conditions, which means that whatever flows out of the top goes directly into the bottom. Another way of thinking about this is that we are actually modeling an infinite array of airfoils, stacked on top of each other. It is assumed that since the outer limits of the computational domain are so far apart, this airfoil behaves as if in an infinite freestream.
- In order to adequately resolve the boundary layer along the airfoil wall, grid points will be clustered near the wall. Far away from walls, where the flow does not have large velocity gradients, the grid points can be very far apart. A hybrid grid will be used in this problem, i.e. a structured quadratic (rectangular cells) grid around the airfoil and outward to an ellipse, connected to an unstructured (triangular cells) grid out to the limits of the computational domain. Grid adaptation within the flow solver, Fluent, will increase the grid density even more near the wall and wherever else needed.
Generate data points defining the airfoil:
- Using an internet browser, go to the NACA 4-Digits Series web page at
http://www.pagendarm.de/trapp/programming/java/profiles/NACA4.html or http://www.ppart.de/aerodynamics/profiles/NACA4.html .
This site enables users to generate any standard NACA 4-digit 2-D airfoil. Note: On some computers, Java may be disabled by default. In some of the older versions of Netscape, Options-Network References, and turn on Java.
- Adjust the values to create various airfoil shapes. Explain to what each of the four digits refer.
- Generate a non-symmetric airfoil, i.e. a NACA 4314 airfoil.
- Change # Points to about 50, which should be sufficient to generate the airfoil shape. Change Point Size to around 3 or 4 so that the points are clearly visible. Show Points.
- Highlight all the data points with your mouse (left click and drag over the text area). On Windows platforms, copy the data points (Ctrl-C).
- Open your favorite text editor, and insert (paste - Ctrl-V on Windows platforms) the data points.
- The very first point of the data should be at the trailing edge, i.e. at (1,0). However, due to resolution and accuracy limits, it may not be exactly correct. If not, change the x value to 1.0 and change the y value to 0.0 on the first line of the data file. This will ensure a nicely defined trailing edge.
- Do the same thing to the last data point, which should also be at exactly (1,0).
- Gambit expects to read three-dimensional data, i.e. x, y, and z for each data point or "vertex". Therefore, the z value must be added manually here. Simply add a blank space or two, followed by "0.0" at the end of each line.
- Save the file (a name such as "NACA4314.txt" is recommended).
- If your internet browser is not on the same computer or cluster as is Fluent and Gambit, you will need to transfer the file onto the appropriate computer (using FTP, or e-mail).
Log on and launch Gambit:
- Log onto a UNIX machine which has a license for the Fluent family of software.
- Note: If using Telnet or rlogin, this step is unnecessary. Create a Unix shell:
From the small window in the upper left of the screen
(usually named Global or Toolchest or something like that,
depending on the operating system),
Desktop-Unix shell.
- Enter "set path = (/disk03/local/Fluent.Inc/bin $path)" to give you access to the Fluent programs. Note: This line should be added to your .cshrc file so that you won't have to add it manually every time you log in.
- At this point, if not already done previously, you should create a new directory called Fluent, so that all of your Fluent projects reside on this directory. To do so, Enter "mkdir Fluent" and then go to this new directory by entering "cd Fluent".
- Also create a new directory called Gambit, as a subdirectory of Fluent. Go to the Gambit subdirectory by entering "cd Gambit".
- Copy, move, or FTP the airfoil data file (NACA4314.txt) onto this Gambit directory so that it is readily available from within Gambit.
- Gambit may now be launched. Enter "gambit -id airfoil &". After a while (sometimes a couple minutes!), the main Gambit window should appear on your screen. Note the "&" at the end of the command, which tells UNIX to run this in background mode. This will free up your UNIX window for other commands while Gambit continues to run.
- In the upper left of the screen, Solver-Fluent 5. This selects Fluent as the solver for which gambit will eventually write the mesh file.
Import the airfoil data points (vertices) into Gambit, and generate other vertices:
- From Command at the bottom of the screen, enter "import vertexdata "NACA4314.txt"" Note: include the quotes around the file name, but not around the whole command. If successful, a vertex is created in Gambit for each (x,y,z) data point present in your text file. These should appear as little plus signs on the screen, and the Transcript Window should show that 78 new vertices were created.
- Now create some more vertices manually. First, we will create a vertex inside the airfoil. In Geometry, Vertex Command Button-R-Create Vertex-From Coordinates. In Create Real Vertex-Global, enter 0.5, 0, and 0 for x, y, and z respectively. Type an appropriate label for this vertex, i.e. "inside airfoil", and Apply. A vertex is created.
- Create another vertex at (1.5,0,0). You can call it "right of airfoil" or something like that. At this point, you may not be able to see the new vertex, since it may be located off the screen. There are two ways to see it. You can zoom in and move with the right mouse and middle mouse, respectively. Or, to fit all the geometry into the available screen space (a very handy tool!), in Graphics/Windows Control (near the bottom right), Fit to Window.
- In a similar fashion, create three more vertices surrounding the airfoil at the following locations (you can enter some labels if desired, or you can let Gambit name them by default): (-0.5,0,0), (0.5,0.3,0) (0.5,-0.3,0). These will be used to help generate a very fine grid near the airfoil wall.
- In the main Gambit window near the upper left, File-Save. This will save your work so far. It is a good idea to do this every so often, especially after a major task is completed.
Create edges from these vertices for the top half of the computational domain:
- Now some edges will be created to define the airfoil and an elliptical boundary surrounding the airfoil. First, the top half of the airfoil will become an edge. This edge will be a curve fit through the vertices just created, from the trailing edge through the vertices defining the top of the airfoil, to the leading edge. Under Geometry, Edge Command Button. (Note: If the button is already open, clicking it again will make the options disappear! If this happens, click it again.)
- Under Edge, right mouse click the top left icon, which is called Create Edge, and then NURBS. (In this learning module from now on, this type of command which requires a right click of the mouse will be denoted by R-Create Edge-NURBS.) NURBS is Gambit's curve-fitting routine, which will fit a smooth curve onto several vertices. NURBS stands for Non-Uniform Rational B-Spline.
- In Create Real Edge From Vertices, make sure the text area called Vertices is highlighted - if not, click in that area. Select, in order, the vertices starting from the trailing edge, and continuing counterclockwise along the top of the airfoil, up to and including the leading edge vertex (the one at the origin). You may need to zoom in to pick them properly. Note that vertices are selected by Shift + left mouse click. We are telling Gambit to create an edge by fitting a smooth curve between all of these vertices.
- In Create Real Edge From Vertices, type in an appropriate label for the edge about to be created. I suggest "airfoil top" or something equally descriptive. Apply. A yellow line should be drawn on the screen connecting the vertices.
- Now Close the Create Real Edge From Vertices window.
- Now we will create the upper half of an ellipse surrounding the airfoil. Under Edge, R-Create Edge-Ellipse.
- In Create Real Elliptic Arc, the Center of the ellipse should be highlighted. Select the vertex inside the airfoil as the ellipse center. Click inside the text box called Major, and select the vertex to the right of the trailing edge of the airfoil. In a similar fashion select the vertex above the airfoil as On Edge.
- Change Angle-End to 180 degrees (since we only want to draw the upper half of the ellipse). Label this edge if you like ("upper ellipse") and Apply. The top half of an ellipse surrounding the airfoil will be drawn in yellow if all is well. Close the Create Real Elliptic Arc window.
- Two more edges are needed to completely define the domain above the airfoil. These edges will be straight lines between vertices. Under Edge, R-Create Edge-Straight.
- Select the vertex at the trailing edge (should be labeled vertex.1 by default), and also the one just to the right of the trailing edge. Label it if you wish, and Apply.
- Similarly, create and edge from the leading edge vertex (should be labeled vertex.39 by default) to the vertex to the left of the leading edge.
- In the main Gambit window near the upper left, File-Save. This will save your work so far. It is a good idea to do this every so often, especially after a major task is completed.
Define node points along the edges:
- In Operation, Mesh Command Button-Edge Command Button. Mesh Edges should be the default window that opens; if not, Mesh Edges.
- Select the airfoil top edge, and in Mesh Edges, change the Spacing option from Interval Size to Interval Count. Enter the number 50 as the Interval Count. Apply. Blue circles should appear at each created node point along that edge.
- Now select the ellipse top, and Apply. 50 node points will appear on that edge as well.
- On the other two edges (the horizontal ones), we want to bunch up the nodes at the airfoil. Select the edge to the right of the trailing edge of the airfoil. Change Interval Count to 20. Change Ratio to about 1.4 or 1.5 so that nodes are really bunched up near the airfoil. Note: If the bunching is backwards from the way you desire, click on the Reverse button. Apply.
- In similar fashion, assign 20 bunched-up nodes on the edge to the left of the leading edge of the airfoil. Don't forget to Apply.
Generate a face above the airfoil from the available edges, and mesh the face with quadratic cells:
- Under Operation, Geometry Command Button, and under Geometry, Face Command Button-R-Create Face-Wireframe.
- It is important to select the edges in order when creating a face from existing edges. (I like to select them in mathematically positive counterclockwise order). Select the upper ellipse edge first, followed by the edge to the left of the airfoil, the upper airfoil edge itself, and then finally the edge to the right of the airfoil. These four edges outline a closed face.
- In Create Face From Wireframe, type in a label for this face ("upper airfoil face" is suggested), and Apply. If all went well, a pretty blue outline of the face should appear on the screen; this is a face, which is now ready to be meshed.
- Under Operation, Mesh Command Button-Face Command Button. The default window that pops up should be Mesh Faces. If not, Mesh Faces.
- Select the face just created. Elements should be Quad by default; if not, change it. Also change Type to Map. The Spacing options will be ignored since nodes have already been defined on all edges of this face.
- Generate the mesh by Apply. If all goes well, a structured mesh around the top of the airfoil should appear. Zoom in to see how the cells are nicely clustered near the airfoil surface. This will help Fluent to resolve the boundary layer around the airfoil.
- You can now Close the Mesh Faces window.
Generate edges, a face, and mesh the face below the airfoil:
- Duplicate the commands just performed, but this time on the bottom of the airfoil. Specifically, first generate an edge following the bottom half of the airfoil from the trailing edge to the leading edge, as before. (You can zoom in or out anytime.)
- Generate the bottom half of the ellipse (angle goes from 180 to 360 or 0 to 180 this time, depending on which vertex you select as Major and On Edge).
- Put 50 uniform points (Ratio = 1) on the bottom of the airfoil, and also on the ellipse edge.
- Create a face below the airfoil from the four edges.
- Create the mesh on the bottom face.
- Caution: Sometimes (I don't know why), the node distribution on an edge will disappear mysteriously. If it does, you must re-assign nodes along that edge before the face can be meshed. In some cases, the mesh on the upper face disappears while meshing the lower face. If this happens, re-mesh the upper face. When all is done, a nice structured grid should appear around the whole airfoil out to the ellipse. We are now ready to define the outer limits of the computational domain, and to generate an unstructured mesh from the ellipse to the outer limits.
Generate the outer limits of the computational domain:
- In Operation, Geometry Command Button, and then in Geometry, Vertex Command Button-R-Create Vertex-From Coordinates. In Create Real Vertex-Global, enter -10, 10, and 0 for x, y, and z respectively. Type an appropriate label for this vertex, i.e. "top left", and Apply. A vertex is created.
- In a similar manner, create and label vertices for the bottom left, bottom right, top right, middle left, and middle right, at locations (-10,-10,0), (20,-10,0), (20,10,0), (-10, 0,0), and (20,0,0) respectively. Use the handy Fit to Window command to see your vertices.
- Now create straight edges between pairs of vertices just created. We will do the top half first, then the bottom half. In Geometry, Edge Command Button-R-Create Edge-Straight.
- Two vertices are needed to define each straight edge.
For example, select the vertex on the right side on the ellipse created previously.
Select also the middle right vertex of the outer domain.
Label this edge "middle right edge" or something, and Apply.
- Now select the middle right vertex and the top right vertex. Create an edge between these two vertices (call it "upper right edge").
- In similar fashion, create edges called "top edge", "upper left edge", and "middle left edge".
- Now repeat for the three remaining edges on the lower half, i.e. "lower left edge", "bottom edge", and "lower right edge". Finally, Close the Create Straight Edge window.
- Note: It is important that the top edge and bottom edge have the
same direction.
In other words, if you created the top edge from left to right,
create the bottom edge from left to right as well.
If these two are backwards from each other, the periodic boundary condition
will not work properly in Fluent.
- To reduce clutter on the screen, we will erase all the vertices, as they are no longer needed. under Graphics / Windows Control, Specify Model Display Attributes-Vertices and Visible-Off. Apply. This does not delete the vertices, but simply removes them from view. Close the Specify Display Attributes window.
Specify the node distribution along these new edges:
- In Operation, Mesh Command Button-Edge Command Button. Mesh Edges should be the default window that opens; if not, Mesh Edges.
- Select the upper left edge, the lower left edge, the upper right edge, and the lower right edge. In Mesh Edges, change the Spacing option, if necessary, from Interval Size to Interval Count. We don't need many nodes this far from the airfoil, so enter 3 as the Interval Count. Apply. Blue circles should appear at each created node point along those edges.
- Now select the edge that runs from the back of the ellipse to the middle right vertex of the outer domain. Change Interval Count to 30 and change Ratio to about 1.4 so that nodes are clustered near the ellipse. (Depending on how you created this edge, it may be necessary to Reverse.) Apply.
- In similar fashion, put about 20 nodes on the edge that runs from the front of the ellipse to the vertex we called middle left. These nodes should also be clustered near the ellipse. (Depending on how you created this edge, it may be necessary to Reverse.)
- The top and bottom edges of the domain will now be meshed. However, they must first be linked, so that the node distribution will be identical. This is necessary in order to define the top and bottom edges with periodic boundary conditions.
Note: The arrows on these edges must be in the same direction, or else the
periodicity will not work.
In Edge, R-Link/Unlink Edges-Link.
- In Link Edge Meshes, select the top edge for Edge. Left click the mouse on the Link With Edge text area, and select the bottom edge. Apply. Close.
- In Edge, Mesh Edges. In Mesh Edges, select the top edge, enter 6 as the Interval Count in Spacing, Set Ratio back to 1, and Apply. Blue nodes should appear on both the top and bottom edges, since they are linked.
- Check that all the edges are meshed. If any of the edge meshes have mysteriously disappeared, re-do those.
- Finally, Close the Mesh Edges window. We are now ready to create faces for the top and bottom, and mesh these faces.
Create an upper face, generate a mesh on the face, and repeat for lower face:
- In Operation, Geometry Command Button. In Geometry, Face Command Button-R-Create Face-Wireframe.
- Beginning with the edge that goes from the back of the ellipse to the middle right vertex, and proceeding counterclockwise, select the edges that make up the big upper face, concluding with the top half of the ellipse. Label this face "upper" and Apply.
- Likewise, generate a face called "lower" on the bottom.
- In Operation, Mesh Command Button, and in Mesh, Face Command Button. If not already the default, Mesh Faces.
- Select the upper face, change Elements to Tri, and Apply. After a while, a triangular unstructured mesh should grow from the ellipse to the outer domain.
- Repeat for the lower face.
- Zoom in to see how the mesh has been applied around the airfoil. If not satisfied, you can change some of the node distributions and re-create the mesh.
Specify the boundary conditions on all edges:
- In order for the mesh to be properly transferred to Fluent, the edges must be assigned boundary conditions, such as wall, inlet, outlet, etc. Actual numerical values, such as inlet velocity, will be specified from within Fluent itself. In Operation, Zones Command Button-Specify Boundary Types Command Button.
- In the Specify Boundary Types window, change Entity to Edges (the default is usually Faces). In this problem, which is 2-D, boundary conditions will be applied to edges rather than to faces.
- Select the two left-most edges of the computational domain, which will become an inlet. Change Type to Velocity_Inlet, and type in the name "inlet". Apply. Some words indicating this boundary condition will appear on the screen.
- Select the two right-most edges. In similar fashion, make this a Pressure_Outlet named "outlet". Be sure to Apply, or the boundary condition will not actually be changed.
- Select both the top-most edge and the bottom-most edge. Change Type to Periodic, and name this "top and bottom". Apply. The periodic boundary condition will be applied to both the top and bottom edges simultaneously. This ensures that whatever flow exits the top edge enters the bottom edge, and vice-versa.
- Select the horizontal edges running from the ellipse to the outer domain, select the two edges making up the ellipse, and the two short horizontal edges going from the airfoil to the ellipse (you may need to zoom in first). Label all of these "Interior". All of these must be assigned as Type Interior. (Interior simply means they are fluid edges, not walls or anything else.)
- Select the two airfoil edges Name these "airfoil", and change Type to Wall. Apply. Close the Specify Boundary Types window.
Write out the mesh in the format used by Fluent, and then exit Gambit:
- In the main Gambit window, File-Export-Mesh-Accept. (The default file name can be changed here if desired, but the default name is acceptable in this case.)
- When the Transcript (at lower left) informs you that the mesh is done, File-Exit-Yes.
- When Gambit exits, the UNIX window will re-appear. Enter "ls -la" to see the files created by Gambit. The airfoil.msh file is the one to be used by Fluent.
- It is a good idea to move this file into the Fluent directory, so that it is ready to be read in. Enter "cd ..", which will move your working directory up one level to the Fluent directory. To verify, Enter "pwd" (print working directory).
- Now enter "mv Gambit/airfoil.msh .", which will move the file from the Gambit subdirectory into the working directory. Enter "ls -la" to verify.
- The mesh file should now be ready for use by Fluent. You may move on to the next learning module, Fluent - Flow over a 2-D Airfoil, which describes how to run this case with the CFD solver, Fluent.