Gambit - Generation of Grid for a Flat Plate Boundary Layer
Latest revision, 20 February 2004, 8:30 a.m.
Introduction and Instructions:
In this document is a procedure that enables students to generate a structured (rectangular) grid, which will be used to solve for both laminar and turbulent boundary layer flow over a flat plate with the CFD program, Fluent. Readers should already be familiar with the notation used in this module, as described in the learning module, Fluent and Gambit - Introduction and General Information.
- We will model flow over a flat plate aligned parallel to the freestream flow. Because of the symmetry, only one half (the upper half) of the geometry needs to be generated. The grid will be formed by a simple rectangle as sketched below (not to scale):
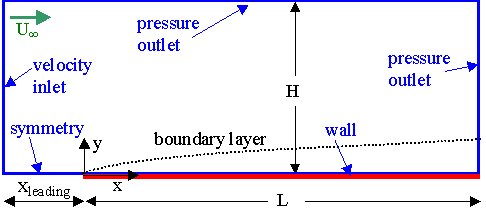
- In the sketch, x is the freestream flow direction, parallel to the flat plate. Coordinate y lies normal to the plate ("up" in the figure). The z direction is out of the page. The problem is two-dimensional, so imagine that the plate extends to infinity in the z direction. However, for purposes of calculating drag coefficients, etc., define b as the span (or depth) of the plate in the z direction. b is generally taken to be one unit length (1 m) for convenience, and drag force FD is reported as drag per unit span (or drag per unit depth) in units of N/m.
- The length of the flat plate is L = 0.5 m, and the height of the computational domain is H = 0.40 m.
- The inlet is located far enough upstream of the plate so that uniform freestream flow exists. In this example, the inlet is xleading = 0.1 m upstream of the leading edge of the flat plate.
- The grid in this example starts at 40 by 30, but the grid adaptation feature of Fluent will be utilized to refine the grid where necessary. Other starting grid densities can be generated, of course, by entering different values in the instructions below.
- In order to adequately resolve the boundary layer along the wall, grid points will be clustered near the wall. Far away from walls, where the flow does not have large velocity gradients, the grid points can be very far apart. Grid adaptation will increase the grid density even more near the wall where needed.
Launch Gambit:
- Log on to the CFD computer in the Fluids Lab.
- Create a DOS shell by double clicking the icon on the computer's desktop called Command Prompt.
- From the Command Prompt line, enter "cd c:\temp" to go to the temporary subdirectory, on which you have write access.
- Gambit may now be launched. Enter "gambit -id name", where name is a unique name for the session without any blank spaces, e.g. "flatplate_Smith_Jones_Group_C".
After a while, the main Gambit window should appear on your screen.
- In the upper left of the screen, Solver-Fluent 5/6. This selects Fluent as the solver for which Gambit will eventually write the mesh file.
Create some data points (vertices) for the desired geometry:
- First, create a vertex at the origin, which is the leading edge of the flat plate. In Geometry, Vertex Command Button-R-Create Vertex-From Coordinates. In Create Real Vertex-Global, enter 0, 0, and 0 for x, y, and z coordinates respectively. Type an appropriate label for this vertex, e.g., "origin", and Apply. A vertex is created, as indicated by a small plus sign at this location.
- Create another vertex with coordinates (-0.1,0,0). You can call it "lower left" or something like that.
- In similar fashion, enter the coordinates of the other points defining the limits of the computational domain, i.e. (0.5,0,0), (0.5,H,0), and (-0.1,H,0). You can name them appropriately ("lower right", "upper right", and "upper left" are suggested), or you can let Gambit label these vertices for you by default.
- Finally, define a point at the top, but at x = 0 so that the grid can be nice and rectangular. Enter vertex coordinates (0,H,0) and call it "upper middle" or something descriptive of its location.
- At this point, it is wise to zoom in somewhat to see the vertices more clearly. There are two ways to do this. You can zoom in and move with the right mouse and middle mouse, respectively. Or, to fit all the geometry into the available screen space (a very handy tool!), in the Global Control area (near the bottom right of the screen), Fit to Window (the button that looks like two paper airplanes).
- In the main Gambit window near the upper left, File-Save. This will save your work so far. It is a good idea to do this every so often, especially after a major task is completed.
Create edges from these vertices to define the computational domain:
- Now some edges will be created to define the flat plate and the rectangular boundary surrounding the plate. Under Geometry, Edge Command Button. (Note: If the button is already open, clicking it again will make the options disappear! If this happens, click it again.)
- Under Edge, right mouse click the top left icon, which is called Create Edge, and then Straight. (In this learning module from now on, this type of command which requires a right click of the mouse will be denoted by R-Create Edge-Straight.)
- In Create Straight Edge, make sure the text area called Vertices is highlighted - if not, click in that area. Vertices are selected by Shift + left mouse click. Select the two rightmost vertices, first the one we called lower right, and then the one we called upper right.
- Type in an appropriate label for the edge about to be created. I suggest "outlet" or something equally descriptive. Apply. Gambit will create a straight edge between these two vertices. A yellow line should be drawn on the screen connecting the vertices.
- In similar fashion, create two separate edges along the top, one along the top right of the computational domain, and one along the top left of the computational domain. If desired, label these "top right" and "top left" respectively.
- Generate an edge along the left side of the domain, and call it "inlet".
- For the bottom of the domain, create two separate edges - one from the lower left vertex to the origin (leading edge of the flat plate), and one from the origin to the lower right vertex. Recommended labels are "leading" and "flat plate" or "bottom left" and "bottom right".
- Now Close the Create Straight Edge window.
- In the main Gambit window near the upper left, File-Save. This will save your work so far. It is a good idea to do this every so often, especially after a major task is completed.
Generate a face above the flat plate from the available edges:
- Under Geometry, Face Command Button-R-Form Face-Wireframe.
- It is important to select the edges in order when creating a face from existing edges. (I like to select them in mathematically positive counterclockwise order). Select the rightmost edge first, followed by the top right edge, the top left edge, the leftmost edge, the edge upstream of the flat plate, and then finally the edge representing the plate itself. These edges outline a closed face.
- In Create Face From Wireframe, type in a label for this face if desired ("domain" is suggested), and Apply. If all went well, a pretty blue outline of the face should appear on the screen; this is a face, which is now ready to be meshed.
Define node points along the edges:
- In Operation, Mesh Command Button-Edge Command Button. Mesh Edges should be the default window that opens; if not, Mesh Edges.
- Select the leftmost (inlet) edge, and in Mesh Edges, change the Spacing option from Interval Size to Interval Count. Enter the number 30 as the Interval Count. It is desirable to cluster or bunch nodes close to the plate. This is accomplished by changing Ratio (in the Grading section of the Mesh Edges window). A Ratio of 1.05 is recommended so that the nodes are clustered near the bottom. Hit the Enter key on the keyboard to preview the node distribution. If the clustering is backwards from the way you desire, click on the Reverse button. Apply. Blue circles should appear at each created node point along that edge.
- Put the same node distribution on the rightmost edge (the outlet).
You may or may not have to Reverse the distribution, depending on the direction in which you created the edge.
Don't forget to Apply; otherwise the node distribution is not saved.
- Select the left portion of the bottom edge (the part upstream of the plate). Change Interval Count to 10. This time, we want to cluster the nodes near the leading edge of the plate.
This time, set Ratio to 1.10, and Reverse if necessary so that the clustering is in the correct direction. Apply.
- Similarly, define 30 node points along the plate itself, clustered near the leading edge of the plate.
- Define the same distribution on the two top edges as on the two bottom edges so that the mesh lines will be vertical. This is not necessary, but makes the mesh look nicer, and rectangular cells lead to better convergence. Don't forget to Apply each time, or the nodes will not actually be saved.
- When all edges have been assigned nodes, Close the Mesh Edges window.
Specify the boundary types on all edges:
- In order for the mesh to be properly transferred to Fluent, the edges must be assigned boundary types, such as wall, inlet, outlet, etc. Actual numerical values, such as inlet velocity, will be specified as boundary conditions from within Fluent itself. In Operation, Zones Command Button-Specify Boundary Types Command Button.
- In the Specify Boundary Types window, change Entity to Edges (the default is usually Faces). In this problem, which is 2-D, boundary conditions will be applied to edges rather than to faces.
- Select the left-most edge of the computational domain, which will become an inlet. Change Type to Velocity_Inlet, and type in the name "inlet". Apply. Some words indicating this boundary condition will appear on the Transcript (located in the lower left portion of the screen).
- Select the right-most edge. In similar fashion, make this a Pressure Outlet named "outlet". Be sure to Apply, or the boundary condition will not actually be changed.
- Select both of the top-most edges. These two edges will be combined into one boundary for Fluent, which will also be a pressure outlet. The label "top" is suggested. Apply.
- Select the horizontal edge running from the lower left to the origin (the one called "leading"). Select its Type as Symmetry, and label it "leading". Apply.
- Finally, Select the edge defining the flat plate itself. Name this boundary "flat_plate" or "plate",
and change Type to Wall. Apply.
- To verify that all the boundary conditions have been entered correctly, turn on Show Labels, and zoom out (drag right mouse button up) to see all the boundary condition labels.
- Close the Specify Boundary Types window.
Generate the mesh on the face:
- Under Operation, Mesh Command Button-Face Command Button. The default window that pops up should be Mesh Faces. If not, Mesh Faces.
- Select the face by shift clicking on one of its edges. Elements should be Quad by default; if not, change it. Also change Type to Map if necessary. Turn the Spacing option off since nodes have already been defined on all edges of this face.
- Generate the mesh by Apply. If all goes well, a structured mesh should appear.
Zoom in to see how the cells are nicely clustered near the leading edge of the flat plate.
This will help Fluent to resolve the boundary layer along the flat plate.
- Zoom back out so that the entire mesh can be clearly seen. This is most easily accomplished by clicking on Fit to Window in the Graphics/Windows Control (the button that looks like two paper airplanes near the bottom right of the screen).
- Close the Mesh Faces window.
Write out the mesh in the format used by Fluent, and then exit Gambit:
- In the main Gambit window, File-Export-Mesh.
Turn on Export 2d mesh, and Accept.
(The default file name can be changed here if desired, but the default name is acceptable in this case.)
- When the Transcript informs you that the mesh is done, File-Exit-Yes.
- When Gambit exits, the DOS shell will re-appear. Enter "dir *.msh" to see the mesh files created by Gambit. There should be a file with today's date and time called "name.msh", where name is the name you previously chose for the title of this session, e.g. "flatplate_Smith_Jones_Group_C". This is the mesh file to be used by Fluent.
- The mesh file should now be ready for use by Fluent. You may move on to the next learning module, Fluent - Laminar Flat Plate Boundary Layer, which describes how to run this case with the CFD solver, Fluent.